|
|
Post by Snappersforum on Jul 27, 2013 8:25:12 GMT
Infrared Cameras I will not go into too much detail here but check out the Wikipedia article here if you have 10 mins to read it and a few hours for all the techie stuff to sink in. If you are interested in this type of photography there are several ways you can achieve the look and effects as shown in the images below   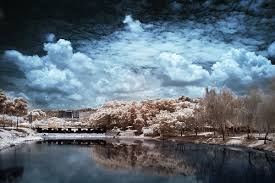 
|
|
|
|
Post by Snappersforum on Jul 27, 2013 8:37:40 GMT
Infrared FiltersHere is the science bit the purpose of an IR filter is to block the visible spectrum of light and only allow the IR portion of light to hit the sensor. So, effectively, it's blocking almost all light. Filters attach or screw onto the front of your lens. You could of course purchase a dedicated infrared camera Focus. Once the filter is on, you won't be seeing much of anything until after the exposure, so focus is your first priority. Infrared light focuses at a slightly different point than visible light, so make sure that you use an aperture in Step 6 that has a decent depth of field. If your lens is one of those that has an infrared focus mark on it, first focus normally, then adjust to that mark. If you opt for colour ir shots you will find Color infrared photography darkens sky and brightens clouds and foliage (grass, trees, plants, and body hair). You will often see two main colors in an IR photo right after you take it, and that is brown and blue. (these colours can be edited in your software afterwards) Place the infrared filter in front of the lens. Set the camera to manual exposure mode. . Set the camera to shoot B&W only. Optional: you can perform this step later; but it's easier to evaluate exposure with the camera set to B&W if that's how you'll print the image. (Note that if you shoot raw, you'll still have the color information--only the preview image is generated in black and white.) Set the camera to a higher ISO rating than usual. . You'll be balancing ISO-generated noise with long shutter speed generated noise. Set the exposure. Take a test exposure and examine the histogram. Since you're usually printing the final image in black and white you'll need a wide histogram that ranges from nearly pure blacks to nearly pure whites. Be careful at the bright end, however--foliage has a tendency to go absolute white in infrared, and you must retain enough working room to keep detail (e.g., don't let the histogram extend off the right side!). Adjust your exposure until you've got the broadest, workable histogram. Take your shot!
|
|
|
|
Post by Snappersforum on Jul 29, 2013 11:13:04 GMT
|
|


